Overview Documentation
How Payviate Works
Payviate allows a merchant to receive online credit card payments without having sensitive credit card information passing through the merchant’s servers.
This is achieved through the inclusion of the Payviate script into the merchant’s web page. The Payviate script will add, to the merchant’s web page, the controls required to take credit card payments. In addition, when the customer clicks the payment button, the script sends the credit card information directly to the Payviate servers, so that the credit card information is never sent to the merchant’s servers.
Here is how it works:
- The customer goes to the merchant’s payment screen.
- When the payment screen is loaded into the customer’s browser, the Payviate script adds the controls needed to receive a credit card payment into the pages document object model (DOM).
- The customer enters his credit card information into the controls added by the Payviate script.
- The customer then clicks the “Process Payment” button that was added by the Payviate script.
- The Payviate script sends the card information to the Payviate servers and a token that represents the card information is created.
- The token is received by the Payviate script and placed in a hidden field.
- The Payviate script removes the credit card information from the page controls that were added to the DOM.
- The page is then posted to the merchant’s server. The merchant’s server does not receive credit card information since the credit card information was removed by the Payviate script.
- The merchant’s server can then send the token to Payviate to complete the sale.
- Since the token does not contain any credit card information, the merchant is free to store the token as desired.
How to Use the Payviate Script
Note: The Payviate script does not perform credit card payments. The script simply requests a token from the Payviate servers that represents the credit card information. The payment process must be completed by sending a payment authorization request from the merchant’s server to the Payviate server. This request would include the token generated by the Payviate script.
To insert the payment controls into the DOM, simply include the script on the merchant’s web page. The merchant’s page must include a <div> control with its id set to “payviate-container”. This div is where the Payviate script will insert the payment controls.
The Payviate script does not set the name property of the payment controls, so they are not included in the form data set when the form is posted to the merchant’s server. In addition, the Payviate script clears the values of the payment controls when a token is successfully created or when the customer clicks the “Cancel” button.
Below is an example of an MVC page using the Payviate script:
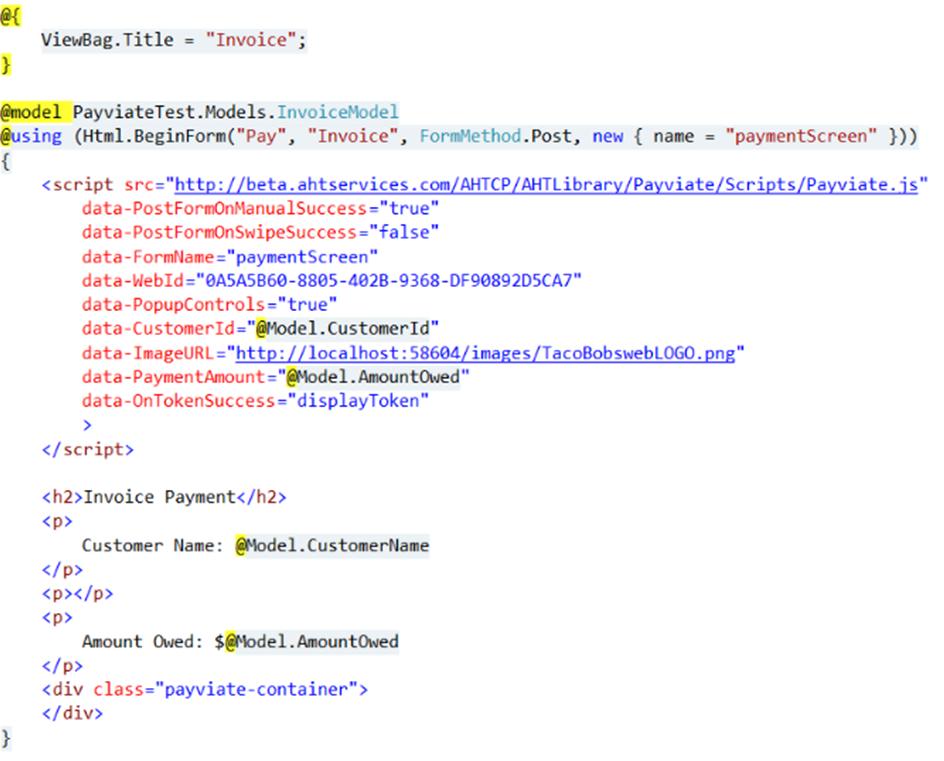
Figure 1: MVC view using the Payviate Script.
As can be seen, the Payviate script is included along with attributes that can be used to control the behavior of the Payviate script. As mentioned, the Payviate script runs when the page is loaded into the customer’s browser. At that time, the payment controls are added to the “payviate-container”.
The following script attributes allow the merchant’s developer to control the behavior of the Payviate script:
- data-WebId – Used by the merchant to pass in their WebId, which is a Payviate assigned unique identifier for the merchant. This value is used by the merchant to identify themselves to Payviate for all transactions sent to the Payviate servers.
- data-PostFormOnManualSuccess – When true, will post the form to the merchant’s server after the token creation process is complete. Affects the manual card entry process.
- data-PostFormOnSwipeSuccess – When true, will post the form to the merchant’s server after the token creation process is complete. Affects the swiped card entry process.
- data-FormName – Used to pass in the name of the merchant’s HTML form. This value is needed to post the form to the merchant’s server after the token creation process.
- data-PopupControls – When true, the payment fields are added to the merchant’s HTML form as a popup.
- data-EmbedControls – When true, the payment fields are added to the merchant’s HTML form alongside the other controls contained on the form.
- data-ImageURL – The URL of an image that the merchant would like to display at the top of the popup form. The image is only displayed when the popup mode is used.
- data-CustomerId – Allows the merchant to pass in a Customer Id, assigned by the merchant, that will be saved in Payviate’s files when the token is created.
- data-PaymentAmount – Allows the merchant to pass in the payment amount. The amount is then displayed on the top of the popup form.
- data-OnTokenSuccess – Allows the merchant to pass in a javascript function name that will be invoked if the token is created successfully. The function must be in the global scope for this to work.
- data-OnCancelClick - Allows the merchant to pass in a javascript function name that will be invoked if the cancel button is clicked. The function must be in the global scope for this to work.
Presentation of Payment Controls
The Payviate script can insert the payment controls into the DOM as a popup, or embedded along with the merchant’s controls.
When the data-PopupControls attribute is set to true, the Payviate script will add the “Pay with Card” button to the container. When the customer clicks the button then the popup is displayed.
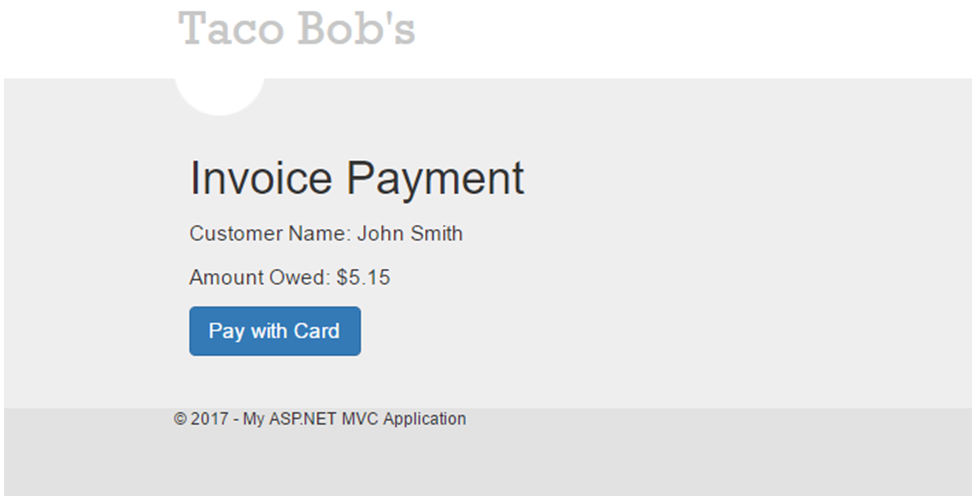
Figure 2: Merchant's invoice page with the "Pay with Card" button inserted by the Payviate script.
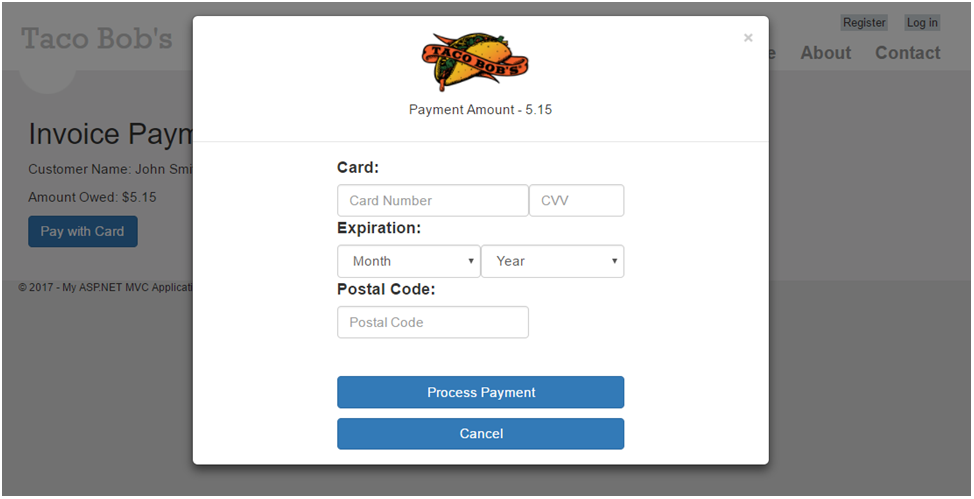
Figure 3: Payviate popup displayed after the customer clicks the "Pay with Card" button.
When the data-EmbedControls attribute is set to true, then the Payviate script will insert the payment controls alongside the merchant’s controls.
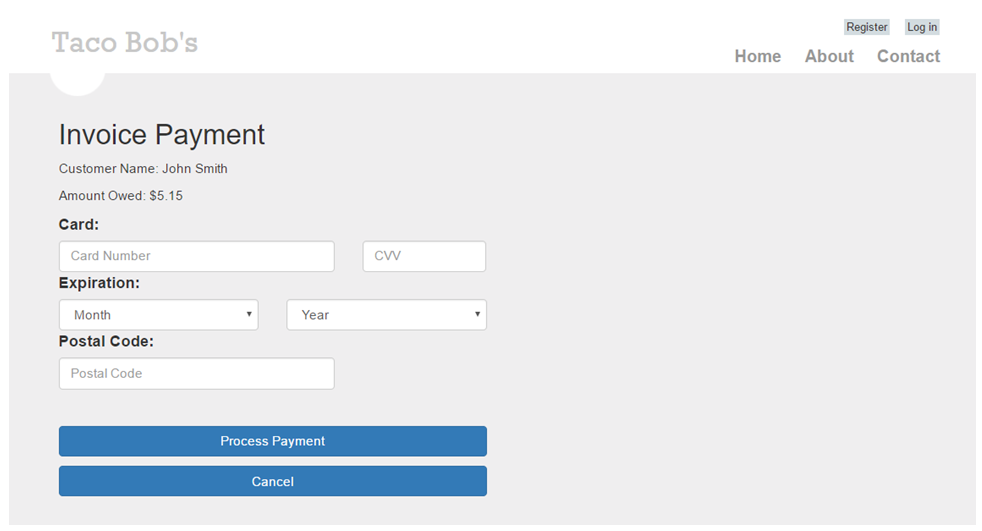
Figure 4: Invoice page with the controls embedded by the Payviate script.
Receiving the Payviate Token
When the customer clicks the “Process Payment” button, the Payviate script sends a request to the Payviate servers for a token. This request includes all the card information provided by the customer. Payviate will securely store the card information and create a token to represent the card information that is returned to the merchant using hidden fields.
Below is a list of the hidden fields used by Payviate:
- payviateToken – this field contains the token returned by Payviate. This value must be sent to Payviate by the merchant’s server to complete the payment process.
- payviateTokenExpiration – contains the date and time that the token will expire and can no longer be used.
- payviateCardType – contains a text description of the card type. For example, possible values are “Visa”, “MasterCard”, etc.
- payviateMaskedCardNumber – contains a masked version of the card number that can be displayed to the user. For example, a masked Visa card number would look like this: 411111******1111. The mask displays the BIN (first 6 digits) and the last 4 digits of the account number.
When the form is posted to the merchant’s server, these values can be retrieved by accessing the hidden fields.
Sending an Authorization Request
Once the token has been received at the merchant’s server, a request for authorization can be sent to Payviate. An authorization is sent by making a request to the Payviate RESTful web service.
The following is an example of a merchant’s MVC controller that retrieves the token and then makes a request for payment authorization to the Payviate web service.
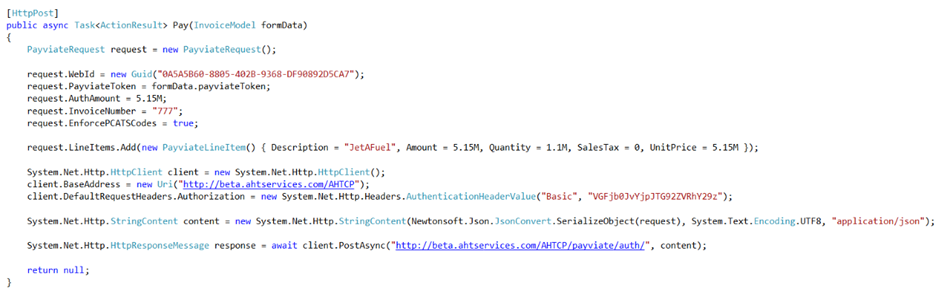
Figure 5: Example of a merchant controller that sends a RESTful request for authorization to Payviate.
Some important things to note from the example above:
- The WebId is a guid assigned to the merchant by Payviate. It is used to identify the merchant and must be sent with every request.
- Request sent to the Payviate service must include a Basic Authentication header. The user name and password for the credentials will be provided by Payviate.
- The request data is serialized to a JSON string prior to sending to Payviate.
- Although the example above is an MVC controller, Payviate is a RESTful service, so requests can be sent by any method.
An authorization request uses the following class structure:

Figure 6: Class structure used by a Payviate authorization request.
Support for Line Items
Payviate supports 3 methods for sending line items:
- No Line Items – An authorization can be sent without line items.
- Free Form Line Items – An authorization can be sent with line item descriptions provided by the merchant. When free form line items is used, Payviate will validate that the total amount of all line items is equal to the amount of the invoice. No other validations are performed.
- PCATS Enforced Line Items – When this method is chosen, then the description must contain the PCATS code as defined by Payviate. The authorization request will be declined by Payviate if a line item is found that does not contain a valid PCATS code. In addition, the amount totals will be validated. This method is used when the EnforcePCATSCodes field of the request is set to true by the merchant.
Payviate Auth Response
The auth response from Payviate has the following structure:

- AHTInvoiceId is the invoice number assigned by Payviate and used to identify the transaction in the Payviate system. It is not the same value as the merchant’s invoice number passed in on the request. The merchant’s invoice number is saved by Payviate as a part of the auth process.
- AuthCode is the authorization code assigned by the card processor.
- AuthResponse is a string value that indicates the outcome of the auth request. If the auth is approved by the processor then the AuthResponse is “APPROVED”. When declined by the processor then AuthResponse is set to “NOT APPROVED”, along with the processor response.
- ApprovedAmount contains the amount approved by the processor.
EMV Transactions
The EMV transaction process is designed to allow a merchant to enjoy the benefits of EMV transactions without having card information pass through their system. To achieve this, the merchant's POS system creates an EMV session with Payviate. When the session is started, Payviate will generate a LinkId that is used to track the between the POS and the EMV terminal. The EMV process uses the following steps:
- The POS system sends a request to Payviate to create an EMV session. Payviate responds with the LinkId.
- The EMV terminal sends a request to Payviate for all open EMV sessions.
- The EMV terminal presents a list of EMV sessions to the Cashier, and the Cashier selects the EMV session that is being paid.
- The EMV terminal gathers the card data and sends it to Payviate using the session's LinkId
- Payviate receives the card data and creates a token to represent the card.
- The POS system makes a request to Payviate with the LinkId. Payviate responds with the token that was created to represent the card. Since the token does not contain any card data, it can be stored in the merchant's POS.
- The POS sends an authorization request to Payviate with the token. Payviate uses the token to look up the card data and send a request to the card processor.
- Payviate responds to the POS' authorization request with a either an accept or decline. The EMV session is complete.
- The POS makes a post request to https://beta.ahtservices.com/ahtcp/payviate/webid/:webid/emv/links/ to begin the session.
- The EMV terminal makes a get request to https://beta.ahtservices.com/ahtcp/payviate/webid/:webid/emv/links/deviceid/:deviceid to retrieve the list of open sessions.
- The EMV terminal makes a post request to https://beta.ahtservices.com/ahtcp/payviate/webid/:webid/emv/terminaldata/ to send the card data to Payviate.
- The POS makes a get request to https://beta.ahtservices.com/ahtcp/payviate/webid/:webid/emv/tokens/linkid/:linkid to retrieve the token that Payviate created for the card data.